I MADE THIS CLUTCH WITH SHARPIE -from PSIMADETHIS


Make your mark in the world… with a marker!  Introducing Stained by Sharpie.  Sharpie’s first ever fabric marker allows you to scribble, draw, color and stain the day away.  My love affair with the iconic brand is no secret.  I was honored by being chosen to “start something with Sharpie”, partnering in the exciting launch.  A DIY clutch was in order.  This season, everyone who’s anyone is joining the clutch craze.  It’s timeless, stylish, and wreaks of chic.  
P.S.- CHECK OUT THE BEHIND THE SCENES CLUTCH CREATION VIDEO! 
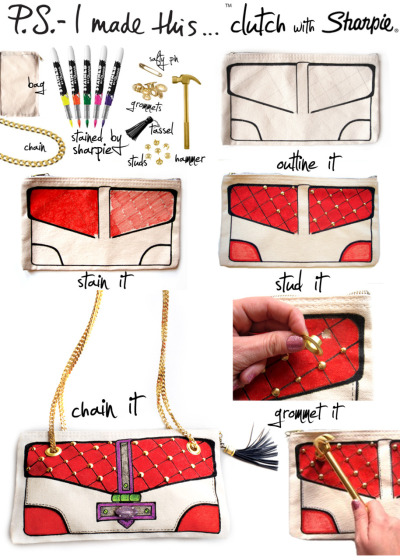
To create a clutch using Stained by Sharpie, outline a canvas bag using a ruler for straight lines, and add your own desired details.   Begin shading in top flap and continue to fill in using different pressures to create a lighter or darker shade.  Use a ruler to measure equal lines and create quilted effect (Approx. 1”).  Outline diamond quilting and add stud.  Place studs where lines intersect, and add stitching detail with dotted straight lines around the border. Next, cut slit for grommets, aligning on both sides and hammer together. Purchase a grommet kit for this step.  Feed chain through all four grommets, using safety pin to join ends of chain (or simply connect with pliers).  Add a fun tassel and “stained” faux hardware inspired by the fab clutches seen on the runways this past season.  Finally, Glue a gem or bauble on for the finishing touch!  
P.S.- A DIY CHALLENGE FOR YOU: START SOMETHING WITH A SHARPIE.  UPLOAD YOUR DESIGNS ON SHARPIE.COM!
Make your mark in the world… with a marker!  Introducing Stained by Sharpie.  Sharpie’s first ever fabric marker allows you to scribble, draw, color and stain the day away.  My love affair with the iconic brand is no secret.  I was honored by being chosen to “start something with Sharpie”, partnering in the exciting launch.  A DIY clutch was in order.  This season, everyone who’s anyone is joining the clutch craze.  It’s timeless, stylish, and wreaks of chic.  


To create a clutch using Stained by Sharpie, outline a canvas bag using a ruler for straight lines, and add your own desired details.   Begin shading in top flap and continue to fill in using different pressures to create a lighter or darker shade.  Use a ruler to measure equal lines and create quilted effect (Approx. 1”).  Outline diamond quilting and add stud.  Place studs where lines intersect, and add stitching detail with dotted straight lines around the border. Next, cut slit for grommets, aligning on both sides and hammer together. Purchase a grommet kit for this step.  Feed chain through all four grommets, using safety pin to join ends of chain (or simply connect with pliers).  Add a fun tassel and “stained” faux hardware inspired by the fab clutches seen on the runways this past season.  Finally, Glue a gem or bauble on for the finishing touch!  

www.psimadethis.com

No comments:

Post a Comment